Workflow Settings
- Introduction
- Targeting & Distribution
- Execution Limits
- Additional Settings
- Plan Restrictions
- Frequently Asked Questions
Introduction
Workflow Settings allow you to configure how your workflow is distributed and limit its execution. These settings help you:
- Target specific countries for your workflow
- Control the execution speed
- Configure device distribution percentage ratios (Desktop, Mobile, Tablet)
- Adjust dispatch execution priority (Priority Multiplier)
- Prevent spam and protect your token budget
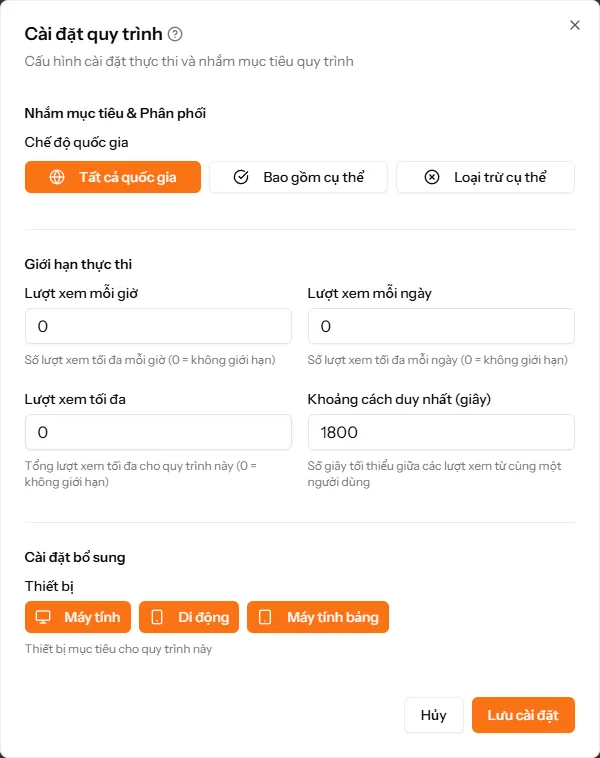
{info} Access: Open Workflow Settings by clicking the "Settings" button on the workflow details page or when creating a new workflow.
Targeting & Distribution
Country Mode
Choose how the workflow is distributed by country:
| Mode | Description | When to Use |
|---|---|---|
| All Countries | Workflow can be run from any country | Want diverse global traffic |
| Include Only | Only allow countries in the list | Only want traffic from specific countries (VN, US, UK...) |
| Exclude Only | Block countries in the list | Want global traffic EXCEPT for specific countries |
Example:
Case 1: Vietnamese website
→ Mode: Include Only
→ Select: VN
→ Result: Only Vietnamese IPs run the workflow

Case 2: International website, avoid Chinese traffic
→ Mode: Exclude Only
→ Select: CN
→ Result: All countries EXCEPT China
{warning} Plan Requirement: This feature requires a Basic plan or higher. Free plans are restricted to "All Countries".
Select Countries
When "Include" or "Exclude" mode is selected, you need to choose the list of countries:
How to select:
- Search: Type the country name or code (VN, US, UK...)
- Check: Click the checkbox next to the country name
- Select Group: Use quick group buttons (SE Asia, Europe, English Speaking...)
- View Selected: Toggle "Selected Only" to show only chosen countries
- Clear All: Click "Clear All" to deselect everything
Country Groups
Quick-select groups available:
| Group | Countries | Count |
|---|---|---|
| SE Asia | VN, TH, MY, SG, ID, PH, MM, KH, LA, BN, TL | 11 |
| English Spk | US, GB, CA, AU, NZ, IE, ZA, IN, PK, NG | 10 |
| Europe | GB, DE, FR, IT, ES, NL, BE, AT, CH, SE, NO, DK, FI, PL, PT, GR, CZ, HU, RO | 19 |
| North America | US, CA, MX | 3 |
| East Asia | CN, JP, KR, TW, HK, MO | 6 |
Tip: Click a group to select all countries in that group at once!
Execution Limits
These limits help control the speed and volume of workflow execution.
Views Per Hour
Description: The maximum number of views the workflow can run in 1 hour.
Value:
0= Unlimited> 0= Specific limit (e.g., 100 views/hour)
How it works:
You set: views_per_hour = 50

Workflow starts running at 10:00 AM
→ 10:00 - 11:00: Max 50 runs
→ 11:00 - 12:00: Resets, max 50 runs again
→ 12:00 - 13:00: Resets, max 50 runs again
When to use:
- Want steady traffic, avoid spikes
- Prevent Google from detecting abnormal traffic
- Control the growth rate of traffic
Example:
Case 1: New website, natural traffic
→ views_per_hour = 20
→ Reason: Avoid sudden jumps, simulate natural growth

Case 2: Large website, needs fast traffic
→ views_per_hour = 200
→ Reason: Can handle high traffic without suspicion
Views Per Day
Description: The maximum number of views the workflow can run in 1 day (24 hours).
Value:
0= Unlimited> 0= Specific limit (e.g., 1000 views/day)
How it works:
You set: views_per_day = 500

Day 1 (00:00 - 23:59): Max 500 runs
Day 2 (00:00 - 23:59): Resets, max 500 runs again
When to use:
- Control daily token budget
- Limit traffic to mimic real users
- Avoid spamming too many views
Example:
Case: Budget of 50,000 tokens/day
Workflow cost: ~100 tokens/run
→ views_per_day = 500 (500 x 100 = 50,000 tokens)
Maximum Views
Description: The total number of views for the entire workflow lifecycle.
Value:
0= Unlimited (runs forever)> 0= Specific limit (e.g., 10,000 total views)
How it works:
You set: max_views = 10000

Workflow runs cumulatively:
→ Day 1: 500 views (total: 500)
→ Day 2: 800 views (total: 1,300)
→ ...
→ Day 20: 400 views (total: 10,000) → STOPS PERMANENTLY
When to use:
- Campaigns with a deadline
- Control total budget
- Avoid workflows running more than necessary
Example:
Case: Boosting traffic for a new post
Goal: 5,000 views in 1 month
→ max_views = 5000
→ Result: After reaching 5,000 views, the workflow stops automatically
{danger} Warning: After reaching
max_views, the workflow will STOP PERMANENTLY. You need to increase the value or set it back to 0 to continue running.
Unique Interval
Description: The minimum time (in seconds) between 2 executions from the same IP address.
Note: Each IP can run multiple different workflows simultaneously (up to 30 threads), but each specific workflow can only run once per unique_interval for that IP.
Default value: 1800 seconds (30 minutes)
How it works:
You set: unique_interval = 1800 (30 minutes)

IP Address 192.168.1.1:
→ 10:00 AM: Thread 1 runs workflow #100 → OK
→ 10:05 AM: Thread 2 tries to run workflow #100 → BLOCKED (same IP, not yet 30 mins)
→ 10:05 AM: Thread 2 runs workflow #101 → OK (different workflow)
→ 10:30 AM: Thread 1 runs workflow #100 for the 2nd time → OK (30 mins passed)Explanation:
- The same IP cannot run the same workflow twice within 30 minutes.
- But it can run many DIFFERENT workflows simultaneously.
Purpose:
- Track by IP address: Matches how Google Analytics tracks visitors.
- Prevent spam: Same IP can't spam the same URL in a short period.
- Support multi-threading: Each IP can run 30 threads, with each thread running a different workflow.
- Realistic traffic: In 30 minutes, 1 IP can run ~180 different workflows (30 threads × 6 workflows/thread).
- Rotating proxy: New IP = new visitor, no limit.
Recommendations:
| Workflow Type | unique_interval | Reason |
|---|---|---|
| Homepage, landing page | 3600s (1 hr) | Real people rarely return within 1 hr |
| Blog post | 1800s (30 min) | Can be re-read after 30 mins |
| E-commerce product | 7200s (2 hrs) | Buyers usually compare longer |
Example:
Real-world case: 100 IP addresses, each with 30 threads
The system has 1000 different workflows
unique_interval = 1800 (30 minutes)

Each IP:

- 30 threads running simultaneously
- Each thread: 1 workflow/5 mins = 12 workflows/hr
- Total per IP: 30 × 12 = 360 workflows/hr
- In 30 mins: 30 × 6 = 180 different workflows

100 IPs:
→ Throughput: 100 × 360 = 36,000 workflows/hr
→ Diverse traffic: 100 IP × 180 workflows = 18,000 combinations per 30 mins
→ Each workflow is executed by many different IPs
Additional Settings
Devices & Distribution Ratio
Description: Configure target device types and customize the execution percentage (%) distribution for each device to match your SEO campaign needs.
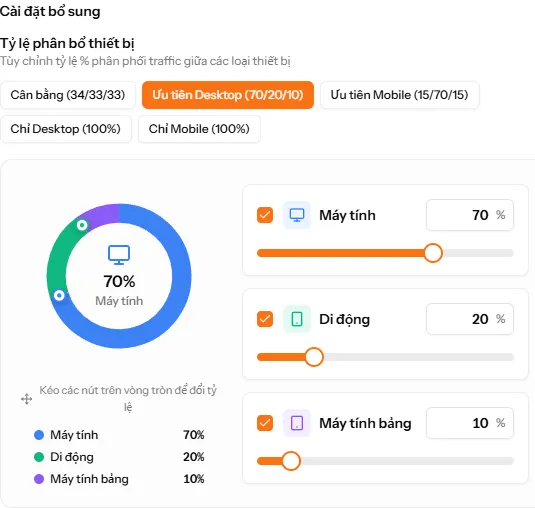
1. Supported Device Types
- 🖥️ Desktop: Simulates desktop and laptop browser environments (Windows, macOS, Linux) with large screens and mouse navigation.
- 📱 Mobile: Simulates smartphones (iOS, Android) with vertical viewports, touch/swipe interactions, and mobile User-Agents.
- 📟 Tablet: Simulates tablets (iPad, Android Tablet) with medium viewports and touch event support.
2. Interactive Donut UI & Features
- Interactive Donut Dragging:
- Drag the handles (knobs) directly along the SVG Donut chart perimeter to dynamically adjust device percentages in real time.
- Smart Sliders & Numeric Inputs:
- Adjust sliders or type percentages directly. The system automatically balances other devices to ensure the sum always equals 100%.
- Flexible Device Toggling:
- Enable or disable individual devices as needed. When a device is toggled off (
0%), its percentage is automatically redistributed among remaining active devices. - At least 1 device must remain enabled (e.g., 100% Desktop or 100% Mobile).
- Enable or disable individual devices as needed. When a device is toggled off (
- 1-Click Quick Presets:
- ⚖️ Balanced:
34% Desktop-33% Mobile-33% Tablet - 💻 Desktop Priority:
70% Desktop-20% Mobile-10% Tablet - 📱 Mobile Priority:
15% Desktop-70% Mobile-15% Tablet - 🖥️ Desktop Only:
100% Desktop-0% Mobile-0% Tablet - 📲 Mobile Only:
0% Desktop-100% Mobile-0% Tablet
- ⚖️ Balanced:
3. Execution Distribution (Weighted Random Sampling)
When executing a workflow run, the Desktop Executor App uses a Weighted Random Sampling algorithm to select a device based on your configured percentages:
Example configuration: 70% Mobile - 20% Desktop - 10% Tablet

- Across 100 runs: ~70 runs on Mobile, ~20 runs on Desktop, ~10 runs on Tablet.
- Each run accurately emulates full device characteristics (User-Agent, Viewport resolution, Device Pixel Ratio, Touch events).
4. Plan Requirements & Runtime Fallback
- Plan Requirement: Customizing device percentage ratios requires a Basic plan or higher. Free plans default to the balanced distribution (
34% Desktop - 33% Mobile - 33% Tablet). - Runtime Fallback (Settings Preservation):
- If your subscription expires and transitions to the Free plan, your custom settings remain safely preserved in the database.
- At dispatch time, the system automatically falls back to default balanced settings (
34/33/33) without overwriting your saved configuration. - Once you renew or upgrade your subscription, your saved custom percentages are instantly restored and applied automatically.
5. Recommended Distribution by Website Type
| Website Type / Campaign | Recommended Ratio | Strategic Rationale |
|---|---|---|
| News, Media, Blogs | 60% Mobile - 30% Desktop - 10% Tablet |
Matches user reading habits where most content is consumed on mobile. |
| E-Commerce & Retail | 70% Mobile - 20% Desktop - 10% Tablet |
Aligns with modern mobile shopping and checkout trends. |
| SaaS & B2B Portals | 80% Desktop - 15% Mobile - 5% Tablet |
Enterprise and software users predominantly browse on desktop. |
| Mobile Apps & Games | 100% Mobile - 0% Desktop - 0% Tablet |
Dedicated for app install landing pages and mobile flow testing. |
| General Purpose Sites | 34% Desktop - 33% Mobile - 33% Tablet |
Balanced traffic profile for natural SEO diversity. |
Priority Multiplier
Description: The Priority Multiplier is a number from 1 to 20 that determines your workflow's dispatch priority position in the execution queue.
How it Works
Basic Principle:
- Workflows with a higher multiplier are dispatched and run first
- When multiple workflows are waiting, the system prioritizes the one with the highest multiplier
- Default multiplier: 1 (basic priority)
- Maximum multiplier: 20 (highest priority)
Real-World Example:
Current Queue:
┌──────────────────────────────────────┐
│ Workflow A - Multiplier: 20 (run 1st)│ ← Selected first
├──────────────────────────────────────┤
│ Workflow B - Multiplier: 7            │
├──────────────────────────────────────┤
│ Workflow C - Multiplier: 5            │
├──────────────────────────────────────┤
│ Workflow D - Multiplier: 1 (waiting)  │
└──────────────────────────────────────┘
When Should You Increase the Multiplier?
✅ Increase it when:
- Campaign needs results urgently
- SEO needs a quick boost in a short time
- Want to spike traffic for an event
- Running a trial and need quick results
❌ No need to increase when:
- Long-term workflow, not urgent → leave at 1-3
- Natural traffic, no deadline
- Want to save costs
Token Cost
⚠️ Important: Priority Multiplier affects the cost!
The priority multiplier is multiplied directly by the basic cost of the workflow to calculate the number of tokens you pay:
Actual Tokens = Basic Tokens × Priority MultiplierCalculation Example:
Suppose your workflow has a basic cost of 100 tokens:
| Multiplier | Formula | Tokens to Pay | Note |
|---|---|---|---|
| 1 | 100 × 1 | 100 tokens | Base price, no priority |
| 5 | 100 × 5 | 500 tokens | Higher priority, 5x price |
| 10 | 100 × 10 | 1,000 tokens | Higher priority, 10x price |
| 20 | 100 × 20 | 2,000 tokens | Highest priority, 20x price |
Why pay more?
- Higher multiplier → workflow runs first → executor receives more tokens
- This is how the market self-adjusts: wanting higher priority costs more
- Ensures fairness: those who pay more are served first
Important Notes
{danger} Cost Warning:
- Priority multiplier INCREASES COST proportionally
- Multiplier 10 = costs 10 times more tokens than multiplier 1
- Only use a high multiplier when really needed urgently
- If all workflows use a high multiplier → you spend more tokens but have no priority advantage
How to Configure
- Go to the workflow details page or when creating a new workflow
- Click the "Settings" button (Workflow Settings)
- Find "Priority & Scheduling"
- Adjust "Priority Multiplier" from 1 to 20
- Click "Save"
Cost Optimization Recommendations
{danger} Token Wastage Warning: Setting a multiplier too high (such as x10 - x20) causes you to spend 10-20x more points without gaining any extra distribution advantage if competitor average is only x1 - x2. Always click "Priority Distribution" to inspect the optimal recommendation!
| Multiplier Level | Cost | Effectiveness Rating | Practical Recommendation |
|---|---|---|---|
| x1 | x1 (Most cost-effective) | 100% cost savings. | Ideal for ongoing natural daily traffic without deadlines. |
| x2 - x3 | x2 - x3 (Recommended) | Most optimal ratio. Usually sufficient to outperform top 95% - 98% of competitors. | Click "Apply x:multiplier" in the analytics tool. |
| x4 - x5 | x4 - x5 | 4-5x higher cost. | Use only when competitor density in your tag category is exceptionally high. |
| x6 - x20 | x6 - x20 (Warning) | Highly wasteful. Costs 6x to 20x more. | Avoid using except for trial testing or extreme emergency campaigns. |
{success} Point Savings Tips:
- Open Analytics: Always click
📊 Priority Multiplier Distributionbefore adjusting.- Use 1-Click Apply: Use the recommended "Apply x:multiplier" button to reach 100% pick chance at minimum cost.
- Revert to x1: When urgent campaigns finish, lower back to
x1for economical long-term traffic.
Distribution Analytics & System Capacity
To help you make intelligent multiplier decisions (achieving desired speed without wasting tokens), Traffic4SEO provides the Priority Distribution Analytics tool.
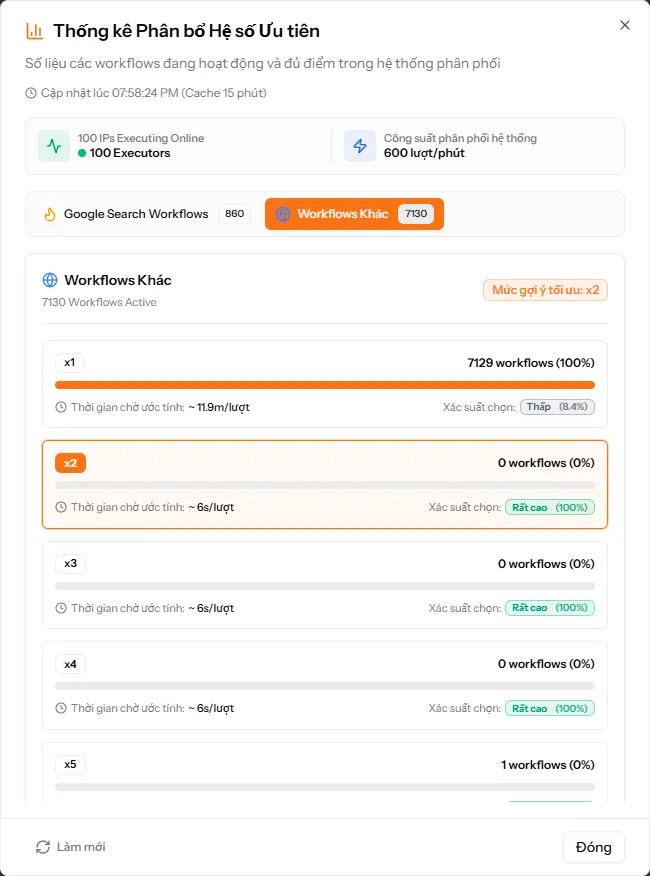
1. How to Open the Analytics Tool
- From the Main Header: Click
⚡ Capacity(on desktop) or the icon⚡(on mobile) on the main header next to the Online status. - From Workflow Settings: Click
📊 Priority Multiplier Distributionnext to the Priority Multiplier label inside the Workflow Settings panel.
2. Key Metrics in the Modal
| Metric | Description | Meaning |
|---|---|---|
| Executors Online | Real-time count of active execution worker IPs online. | Indicates current global system processing capacity. |
| System Dispatch Capacity | Maximum views system can dispatch per minute (views/min). | E.g., 20 Executors Online = 4 views/min (Google Search) or 120 views/min (Other Workflows). |
| Auto-detected Tag Category | Split into two tabs: Google Search Workflows vs Other Workflows. | Automatically detects workflow tags to display competitor density within your exact pool. |
| Est. Wait Time | Estimated average wait interval between views (~ X/view). |
Helps predict view delivery speed for each multiplier level. |
| Pick Chance | Evaluates the probability level of your workflow being picked (High, Medium, Low). |
Helps assess the competitiveness of your current multiplier. |
| Optimal Multiplier | System-recommended multiplier (e.g. x2). |
Helps you achieve 100% pick chance while saving tokens. |
3. Smart Warning Alerts
The tool automatically generates recommendations to optimize token spending:
- 🟢 Optimal Recommendation: Shows the minimum multiplier required to reach top priority tier.
- 🟡 High Multiplier Notice: Appears when your setting is unnecessarily high (e.g., set to
x10whenx2is sufficient to reach 100% pick probability). Saves tokens by letting you apply the recommended multiplier with 1-click. - 🔵 Priority Opportunity: Notifies you when increasing from
x1tox2orx3instantly elevates your workflow to 100% pick probability in the first minute. - ⚠️ Capacity Bottleneck Notice: Appears when total active workflows exceed active executor speed, suggesting a higher multiplier to reduce wait intervals.
{info} Cache Duration: Distribution statistics are computed and cached in Redis for 15 minutes to ensure system performance.
Browser Profile & Session Persistence
Description: The Browser Profile & Session Persistence feature enables workflows to persist browser state (including Cookies, LocalStorage, SessionStorage, and Cache) across consecutive executions on the same executor instance.
1. How It Works & 7-Day Retention
- Disabled by default (
false): By default, every workflow run launches in a clean, isolated browser environment (Clean Browser Context). Once execution finishes, all temporary browsing data is wiped immediately. - When enabled (
true): The executor machine uses a single persistence profile to run the workflow. Cookies and web storages (LocalStorage, SessionStorage) are preserved and automatically deleted 7 days after the first execution.
2. Purpose & Key SEO Benefits
- 🔄 Increase Returning Visitors Ratio: In web traffic analytics systems, recurring visitors generate strong engagement signals and high domain authority metrics.
- 🛡️ Improve Browser Trust Score: Helps bypass advanced anti-bot protection mechanisms by maintaining authentic browser cookies and browsing history.
- 🎯 Accurate Attribution & Funnel Tracking: Allows analytics pixels and conversion funnels to track realistic multi-touch user journeys over time.
{warning} Important Note on Analytics & Interval Configuration:
- Impact on Users count: When enabled, the total number of Users recorded in analytics tools will decrease because visits from the same executor profile are tracked as Returning Visitors.
- Sessions & Pageviews unaffected: Sessions and Pageviews are not negatively impacted as analytics sessions refresh every 30 minutes.
- Unique Interval Requirement: You must set
unique_intervalto at least 1800s (30 minutes) to ensure each subsequent run is counted as a fresh session.
3. Plan Requirements & Runtime Fallback
- Plan Requirement: Browser Profile Persistence requires a Basic plan or higher. Free accounts always run with clean browser contexts.
- Runtime Fallback (Settings Preservation):
- If your subscription expires and downgrades to the Free tier, your enabled Profile Persistence toggle remains safely preserved in your database configuration.
- At task dispatch time, the runtime system safely falls back to clean execution without overwriting your saved settings.
- As soon as you renew or upgrade your plan, profile persistence is instantly re-enabled automatically.
Plan Restrictions
Certain Settings features require higher plans:
| Feature | Free | Basic | Pro | Enterprise |
|---|---|---|---|---|
| Country Mode | All | All/Include/Exclude | All/Include/Exclude | All/Include/Exclude |
| Device Distribution (%) | Default (34/33/33) | Custom % ratio | Custom % ratio | Custom % ratio |
| Priority Multiplier | 1 - 20 | 1 - 20 | 1 - 20 | 1 - 20 |
| Profile Persistence | ❌ (Clean context) | ✅ (7-day retention) | ✅ (7-day retention) | ✅ (7-day retention) |
| Execution Limits | ✅ | ✅ | ✅ | ✅ |
If using features not in your plan:
- The system will apply default values.
- A notification to upgrade your plan will be displayed.
Frequently Asked Questions
❓ What limits should I set for a new website?
Safe recommendation:
views_per_hour = 10-20
views_per_day = 100-200
unique_interval = 3600 (1 hour)Reason: New websites should increase traffic gradually to avoid suspicion from Google.
❓ What is the difference between views_per_hour and views_per_day?
views_per_hour: Limits SPEED (avoids sudden spikes in 1 hour). views_per_day: Limits TOTAL VOLUME (controls daily budget).
Example:
views_per_hour = 50
views_per_day = 500

→ Max 50 runs per hour
→ Max 500 runs per day
→ If running steadily: 50 runs/hr x 10 hours = 500 runs/day
❓ What if I set views_per_hour = 100 but views_per_day = 500?
The system will prioritize whichever limit is reached first:
Hour 1: 100 runs (total: 100)
Hour 2: 100 runs (total: 200)
Hour 3: 100 runs (total: 300)
Hour 4: 100 runs (total: 400)
Hour 5: 100 runs (total: 500) → DAILY LIMIT REACHED
Hours 6-24: STOPPED (daily limit reached)
❓ Can I change settings while a workflow is running?
YES! You can change settings at any time:
- Changes apply IMMEDIATELY to subsequent runs.
- Runs already in progress are NOT affected.
❓ When does unique_interval reset?
unique_interval is calculated from the last run of each IP address:
IP Address 192.168.1.1:
→ Runs workflow #100 1st time: 10:00 AM
→ unique_interval = 1800s (30 minutes)
→ Can run workflow #100 again: 10:30 AM

Note: This IP can still run OTHER workflows (101, 102, ...) during the wait.
It DOES NOT RESET by day/time like views_per_hour or views_per_day.
❓ Does unique_interval track by instance or IP? How does it affect multi-threading?
It tracks by IP ADDRESS, not instance ID.
Multi-threading:
- 1 IP can open up to 30 threads simultaneously.
- Each thread can run a DIFFERENT workflow.
- But it CANNOT run the same workflow twice within the unique_interval.
Example:
IP 192.168.1.1 with 30 threads (10:00 AM):
Thread 1: Runs workflow #100 → OK
Thread 2: Runs workflow #101 → OK
Thread 3: Runs workflow #102 → OK
... (30 threads running 30 different workflows)

Thread 5: Tries to run workflow #100 (already run by Thread 1) → BLOCKED
→ Reason: Same IP, workflow #100 hasn't cleared unique_interval.
Thread 5: Runs workflow #131 → OK (workflow not yet run)

10:35 AM (after 35 mins):
Thread 10: Runs workflow #100 again → OK (30 mins passed)
❓ What does views_per_hour = 0 mean?
0 = UNLIMITED
views_per_hour = 0 → Unlimited runs per hour
views_per_day = 0 → Unlimited runs per day
max_views = 0 → Runs forever
❓ Does selecting more countries cost more tokens?
NO. The number of countries does not affects token cost.
Cost only depends on:
- Number of nodes in the workflow
- Wait time
- Priority multiplier
❓ A workflow reached max_views, how do I continue?
Method 1: Increase the max_views value. Method 2: Set it to 0 (unlimited). Method 3: Reset total_views to 0 (contact admin).
❓ Why is my workflow not running even though it hasn't reached its limits?
Check these conditions:
- Workflow Status: Must be "Active".
- Tokens: Account must have enough tokens.
- Hourly/Daily Limits: Might have reached the limit.
- App instances: Are any app instances online?
❓ Why does my workflow accumulate views slowly despite having plenty of tokens?
When your account has ample token balance but view delivery is slow, it is usually caused by two configuration reasons:
- Unique Interval is set too high:
- Reason: If you set
unique_interval = 1800(30 minutes), each online worker IP must wait a full 30 minutes before it is allowed to execute your specific workflow again. - Solution: Lower the Unique Interval to a shorter duration (e.g.
600s- 10 minutes or300s- 5 minutes) so active worker IPs can revisit and execute your workflow more frequently.
- Reason: If you set
- Priority Multiplier is too low:
- Reason: Your workflow multiplier is at the default
x1, while competing workflows in the same category (e.g. Google Search) have set higher multipliers (x2,x3), causing the system to dispatch views to competitors first. - Solution: Open Workflow Settings, click
📊 Priority Multiplier Distribution, and click "Apply x:multiplier" (usually raising fromx1tox2orx3achieves 100% pick chance in the first minute without overspending tokens).
- Reason: Your workflow multiplier is at the default
Summary:
- Workflow Settings help control distribution and speed of execution.
- Reasonable limits make traffic more natural and save tokens.
- You can change settings at any time without stopping the workflow.
- Some features require a Basic plan or higher.